

Here are few simple steps to set up a custom domain from GoDaddy to point on your Blogger blog. I select GoDaddy’s domain since they are one of the cheapest domain register on the web.First let’s discuss on how we can set up a Blogger/Blogspot blog custom domain with GoDaddy, then I’ll be discussing on my next post on how to set up the custom domain on Blogger.
1. Log in to your account at www.godaddy.com.
2. Open the Domains tab and select My Domain Names. You'll be directed to the Domain Manager page.
3. Click the domain that you'd like to use with your blog.
4. Click the Total DNS Control And MX Records link at the bottom of the section entitled Total DNS.
5. Look for a record prefixed "WWW". If there isn't one, add a new CNAME record; if there is one, you'll need to edit this record instead.
6. For the Name, enter only the subdomain of the address you want to use for your blog. For example, if you picked www.mydomain.com as your address, enter “www” here. (you can leave it as is)
7. Enter ghs.google.com as the Host Name. Specify a TTL or use the default setting of 1 hour.
8. Click OK, and then click OK again.
Example Image Below
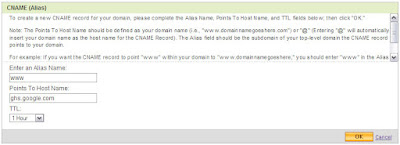
If you are getting confuse on what to fill up on Step 6, personally I don’t modified it and leave it as is “www” since it is just a “name” for that set up and when you are not hosting your Blogger blog then it has no bearing at all. I think it will be necessary if you will be handling or hosting a site with subdomains, labeling as alias is great to organize your domain set up. So basically you just need to modify “Host Name” by entering “ghs.google.com”.
Now it is advisable that you set your URL with appended “www”, like Example http://www.tsksoft.com than http://tsksoft.com ,("Please Note That(www.tsksoft.com)Is Just An Example Domain Name And "TSKSOFT" Don't Have Self-Hosted Domain Yet").
Here are few steps to set it up on GoDaddy;
1. Log in to your account at www.godaddy.com.
2. Open the Domains tab and select My Domain Names. You'll be directed to the Domain Manager page.
3. Click the domain that you'd like to use with your blog.
4. Find Forwarding and click Manage.
5. Enter your URL with appended “www” as www.yourdomain.com, then tick “Update my DNS settings to support this change. (Recommended)”, clicking the “Advanced Option” will show you that your URL is permanently forwarded (permanent redirect 301) to your specified www.yourdomain.com.
5. Click OK.

You need to wait for few minutes to test if your forwarding is working; you can check it by typing to your browser address tab your URL without appended “www” (http://yourdomain.com) then you’ll see if the page load the URL will be automatically change to http://www.yourdomain.com.
If you’re encountering troubles setting up this process, you may leave your questions & comments on the comment form below and I’ll try to answer it as soon as possible!! :)
1. Log in to your account at www.godaddy.com.
2. Open the Domains tab and select My Domain Names. You'll be directed to the Domain Manager page.
3. Click the domain that you'd like to use with your blog.
4. Find Forwarding and click Manage.
5. Enter your URL with appended “www” as www.yourdomain.com, then tick “Update my DNS settings to support this change. (Recommended)”, clicking the “Advanced Option” will show you that your URL is permanently forwarded (permanent redirect 301) to your specified www.yourdomain.com.
5. Click OK.
Example Image Below

You need to wait for few minutes to test if your forwarding is working; you can check it by typing to your browser address tab your URL without appended “www” (http://yourdomain.com) then you’ll see if the page load the URL will be automatically change to http://www.yourdomain.com.
If you’re encountering troubles setting up this process, you may leave your questions & comments on the comment form below and I’ll try to answer it as soon as possible!! :)
And Friends,Please pass your valuable feedback through comments...! :)
0 comments :
Post a Comment
Only Comments which have valuable feedback are approved to reduce the spam comments. So, take a note that we approve only right feedback related to the article you comment.