Showing posts with label Blogger Hacks. Show all posts

UCOZ - A Free Website Builder

Posted On // Leave a Comment
Owning a website is a dream for most people who would like to put up their thoughts and ideas on the internet. In the past it was very hard for ordinary people to get their own websites because the domain registration and hosting costs were too high for a lot of people. Nowadays domain registration fees have come down drastically, but the high hosting fees still make some people nervous. But luckily, there are some good solutions out there which provide free website hosting to the public. I know most of you might have heard of such “free” services, and you might be skeptical about them, and for good reason. Most free website hosting services aren’t actually very useful other than for running a few test websites. But there are a few good services out there which you can trust. I have recently found one such service where you can not only get free website hosting, but you also get a free website maker! Now that’s a good news for people who do not know much about website designing! One look at the services offered by this site will be enough to tell you that this is not like those other trashy website creation/hosting services. Using this service you can create your own website within minutes, and it’s really easy to use as managing a website is as easy as managing BLOCKS. I hope you do like it! 

By the way some of its main features are…! 
A free website builder as said above which allow users to create E-mail forms, Forum, Photo Album and many more in-built. 
A collection of unlimited templates to use for your site, By default it provides 250 Templates . 
Integration with Popular Web-Services Google Maps, PayPal, YouTube, Deposit Files, Pixlr and more….! 
Gives the users to add 21 modules, thousands of widgets and gadgets 
Having the option to make a backup of your valuable data 
Supports Modern CMS 
Gives the Domain name like site.com 


Site Advantages: 
The best thing is there is no space limit. Its Unlimited Disk Space 
You can have the total control on your site. 
Simple Interface which can be accessed easily without hesitation. 
Support can be given in a unique way..By providing Textbooks, manuals, technical support 
A Friendly Community 


Some of the Quick Facts about the site…! 
Supports 13 Language Localizations 
Provides 99% UpTime. 
Every site almost 1,000,000 active websites with no Downtime 
Site gets 100 million user Hits daily

Please let me know your feedback and suggestions through comments JJ


[Read more]

Adsense Revenue Sharing Widget For Blogger Blogs

Posted On // Leave a Comment
Hi my dear Loyal Readers and Friends.Today am going to teach how to add a Adsense Revenue Sharing Widget in blogger.We all think adding Adsense Revenue Sharing in blogger is very hard but now its very easy by implementing this simple tutorial.
Actually,What is meant by "Adsense Revenue Sharing".
  • You can share the adsense revenue with different People/Authors
  • You can get more traffic to your Blog/Website
  • Can have more Guest posts from different Authors
  • Traffic from different countires
  • More Adsense impressions
  • Increase your site SEO(Search Engine Optimization) Ranking
  • For more info visit : What is the AdSense Revenue Share
So,Now lets Start the tutorial........

Sign-in to Blogger.com Goto-->Design-->Edit Html
Now Check Expand Widget Option
Now find the following code in your Template:

<data:post.body/>

Now, paste the following code just above <data:post.body/>

<b:if cond='data:blog.pageType == "item"'>

<b:if cond='data:post.author == "Author_1"'>

PASTE THE AD CODE OF Author_1 HERE

</b:if>

<b:if cond='data:post.author == "Author_2"'>

PASTE THE AD CODE OF Author_2 HERE

</b:if>

<b:if cond='data:post.author == "Author_3"'>

PASTE THE AD CODE OF Author_3 HERE

</b:if>

</b:if>

It will not work directly by Copying/Pasting the AdSense code.So,You should Parse the AdSense Code from here.And make sure that you paste the code as shown below in the image
Preview Image

Now replace the 'Red Color Text' with your 'Author AdSense Code'. And Replace 'Blue Color Text' with the NAME of the Author (The name you choose while you register).The author names must not be different, it must be unique.Now place the author name when they have chosen when they registered at the blogger account.
It can be found on the profile editing page.
Preview Image
Finally,Now save your template.And now your writer can get fully monetized post...!You can also use this trick for ad networks like Chitika and other sites if you don't like to use it for AdSense its upto the Author Choice.
It is your choice to choose the banner size. I recommend to place square banner. It is best visible on the blog posts.

Now your blog is Adsense Revenue Sharing Blog with multiple authors where each and every authors can get benefits whenever they write on your blog. Enjoy blogging with blogger!

Please pass your suggestions and problems by using the comment section. :)
Have a nice day :)
Comments Are Do-Follow :)
SEO Friendly :)

[Read more]

How to Add Google index page checker

Posted On // Leave a Comment
You can use this Google index  page checker .By using this you can see your site Google index page on
your web browser
 1. Log in to blogger and Go to  Design >> Page Element

2.Now click Add Gadget and select the HTML/Javascript

3.Now paste below code.

<form method="get" action="http://www.google.com/search" target="_blank" rel="nofollow"><input name="q" value="Site:" maxlength="255" size="40" type="text"><input value="Google Index" type="submit"><input value="en" name="hl" type="hidden"></form>


5. Now click save you are done.

Please post your valuable feedback through comments and share your thoughts with us :)
Have A Nice Day :)
[Read more]

How to add Rainbow cursor for blogger

Posted On // Leave a Comment
Today,I am going to teach you how to add a rainbow cursor for your blogger.It displays when the user move the mouse cursor to the website window.So,lets start the tutorial immediately.


1. Log in to blogger and Go to Design >> Edit HTML

2 .Make sure u Click on "Expand Widget Templates"

3. Find this tag by using Ctrl+F    </body>
4. Paste below code before  </body> tag


<style type="text/css">body, a, a:hover {cursor: url(http://cursors4.totallyfreecursors.com/thumbnails/rainbow-ani.gif), progress;}</style>


5. Now click preview and click save template .you are done.

Image Preview For The Code Result:
 
 Note: You can change the url link from the code and add your favorite image link to display instead of the given Rainbow Cursor.


Please post your valuable feedback through comments and share your thoughts with us :)
Have A Nice Day :)
[Read more]

How to make all links open in new windows

Posted On // Leave a Comment
This request to make all hyperlinks pops up every now and then so might as well make a post for it. To make all links open in new window is amazingly simple. Just sign into

DASHBOARD > DESIGN > EDIT HTML
to open template editor

Use keyboard shortcut ctrl+F to find and immediately after that, add a single line <base target='_blank' /> so that it become


<head>
<base target='_blank' />

Save the edited template and viola, all links in your blog will now open in new tabs or windows

Note: Blogger is now XHTML so all tags must have matching closing tags or be self closing. The above tag is self closing because it has that forward slash / at the end of the tag.
[Read more]

How To Show HTML/CSS Codes In Blog Posts

Posted On // Leave a Comment
Today i am going to teach you how to add Html codes in blog posts.By default web browsers read the code as a program rather than showing the code which you like to show up to your visitors or any other.So,its makes much difficult to make that way of showing the Html/Css Code and it is the most common problem for Blogger beginner's and Intermediate users.So,Now when we come back to the topic.I am going to teach you how to show up the Html/Css Code in a Box with good looking background.

Let Us Start The Topic:


  • First go to Blogger and then Sign-in
  • Go to your Dashboard--Layout(Design)--Edit Html


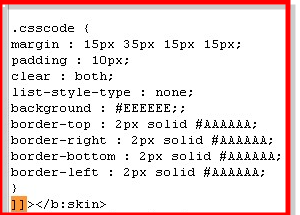
  • Now just copy the following code which is shown below and paste it before  ]]></b:skin>
--Note: Download your existing template Before you save changes in the template


.csscode {
margin : 15px 35px 15px 15px;
padding : 10px;
clear : both;
list-style-type : none;
background : #EEEEEE;;
border-top : 2px solid #AAAAAA;
border-right : 2px solid #AAAAAA;
border-bottom : 2px solid #AAAAAA;
border-left : 2px solid #AAAAAA;
}

For More Info you Can See How To Add The Code In The Below Image:

  • Now save you template to make the changes apply

From Now whenever you like to add a code in your post just add the code between 
<div class=”csscode”> and </div> like these as Shown below:


<div class="csscode">
HTML Code Here
</div>


That's it....!
Now you can show any of your code in a separate box easier to use
Please let us know if you any problem via comments
Have A Nice Day...!

    [Read more]

    How To Reduce Your Blog's Bounce Rate?

    Posted On // Leave a Comment
    This post basically explains the following questions: What are Analytics?? What is a bounce rate?? How vital is it to your blog?? How to reduce the bounce rate of your blog?? Once you build a website or a blog, your primary aim is to increase the traffic to your site/blog, in other words, you try to attract as many people as possible. This could be achieved by the adding your posts to various social bookmarking sites, networking sites, participating in forums and so on.

    Do you think, it is enough if we just increase the traffic to our blog??? Definitely not!!! You need to analyze the traffic or statistics(analytics) of your blog. So, What are Analytics? To keep it very simple, it is a tool to measure your site's performance. It displays various data regarding your blog and bounce rate is one such data. Most of the newbies install Google Analytics on their blogs but they do not know, how to interpret these data. I restrict myself to explain only about "Bounce Rate" in this post.

    So, What is a Bounce Rate? Wikipedia defines it as, "Bounce rate is a term used in web site traffic analysis. It essentially represents the percentage of initial visitors to a site who “bounce” away to a different site, rather than continue on to other pages within the same site." I feel the statement is pretty self-explanatory.

    To keep it very simple, bounce rate simply represents those percentage of visitors who move away to some other site after visiting a page on your website. You may find the percentage for "Bounce Rate" on the right corner below the graph once you log in to your Google Analytics Account. Higher the bounce rate, more the number of people leave your blog after a single web page visit.As per the definition, an ideal percentage of bounce rate would be zero. Practically speaking, a bounce rate below 60% is good for any blog. So, our only task is to make him/her stay in our blog or in other words, just get the second click out of the visitor. Though, it appears to be very easy, it is one such area that even probloggers constantly work upon.. I am pretty sure few ideas would have cropped if you clearly understood the post till this. You may implement your ideas but, do consider the following methods in reducing the bounce rate.

    1. Clean Template: The first impression is always the best impression and you can gain that best impression only when your blog looks clean and tidy. It is not necessary that it should look very professional but, it should be clean. I mean the widgets should be placed properly, broken links should be updated and so on.

    2. Quality Content And Keywords: Content is always the king!! So, it is very important that your blog provides quality content. Please, ensure that the keywords are relevant to the content of your blog. It is important that both the keywords and content go hand in hand or else you end up providing the wrong information to the search engines. By doing this, you lose the second click from the visitor.

    3. Internal Links: This serves to be the most effective way of reducing a blog's bounce rate. When you provide links which are relevant to the content, within your blog, it is obvious that the user makes a click on it and thereby, he keeps hopping around your blog. In fact, you end up boosting your page views and back links too.

    4. Related Posts: The last factor which I would suggest to reduce the bounce rate would be the related posts widget. I recommended every blogger to add this widget which is given by Blogger at the end of every post. It will have a tremendous effect in reducing your bounce rate and increase the page views of your site. or try using Linkwithin.com which now i am using for my blog.

    As far as I know, the above four methods will definitely reduce the bounce rate. To be very frank, even I am currently working on reducing the same for my site. I So, I appreciate any ideas from your side as well. Leave them as comments below this post and I assure you that I will include them in my next series of post.
    [Read more]

    How To Speed Up Your Blogger/Blogspot Blog?

    Posted On // Leave a Comment
    Basically, the speed with which your blog loads is inversely proportional to the time it takes to load. I have explained this post in terms of reducing the load time. More over, when browsing the net, I found an article which mentioned that even the site/blog load time contributes significantly to the Google PR. So, how do I find out whether my site load time is quick or slow. If you need an answer to this question, then visit the following link "Website Optimization Speed Report" and enter your URL to have a complete report about your site load time.


    Scroll to the end of the report page and you will notice various sections say TOTAL_HTML, TOTAL_OBJECT and so on. Each section will be highlighted either in red or green or yellow. So, what do they indicate. The report will clearly explain the color and its significance. How ever, I would like to briefly say that, it indicates the areas where you need to concentrate so as to improve the speed of loading your website. Red indicates immediate attention while yellow indicates moderate attention and green signifies an optimal performance.

    I suggest you to read each and every line of that report before you proceed with this post. The report will clearly specify what scripts or images can be compressed and how much bytes could be saved by doing so. Once you have analyzed the above report, it is time to take few steps to reduce the load time. Although, there are various methods through which the load time can be reduced, I restrict myself to the most effective methods in this post. Now, let's move on to the methods!!!


    1. SIMPLY THE CSS SECTION:
     This method involves the compression of the CSS section of your blogger template. To do this, just visit the following link "Free Web Based CSS Compressor" and paste the CSS part of your blogger template. Once you paste the code, hit the compress button and you will find the reduced version of the CSS code. Now, replace this code instead of the CSS part of your template and save it. Ensure that, there is no problem after replacing the code by having a preview of your blog.

    (Note: Before trying this step, please make a back up of your template. More over, the CSS part of your template is the code which lies between the  andcode.)
    2. POSTS ON HOMEPAGE: The earlier versions of blogger/blogspot blogs did not include the "Read More" hack and people displayed the entire post on the blogs. How ever, this trend has reduced in the new version of blogger to some extent. Still, there are blogs where in , the home page includes so many number of posts that it becomes completely annoying for the visitor who visits the blog. Apart from losing a visitor, you lose the impressions and the bounce rate of your blog also increases.So, reduce the number of posts on your home page. To do so, navigate to Settings->Formatting from dashboard and enter 4 or 5 for your blog with the "Read More" hack installed in your blog.

    3. IMAGES OF YOUR BLOG:
     The images displayed in your blog play a very vital role in your site load time. The images when hosted at different sites say "Imageshack, Photobucket, etc.." contribute a significant load time. This is due to the diversity of your images, that is, your images have to be fetched from different servers. To avoid this, you may use a single server to host your images. Say use only Photobucket to host all your images. Thereby, you fetch multiple images from only one server and it reduces the load time drastically. Moreover, you may compress the images which you host, thereby the images will load faster than what it did, before compression.

    4. AVOID SCRIPTS:
     The scripts that are included in your blog template also plays a vital role in the loading time of your website. Try to remove the scripts which you feel are unwanted. Apart from the scripts, remove the widgets which are unnecessary from your blog too. So, how do I decide a widget is important or not? Just ask the following questions to your self and you will have a conclusion. Firstly, Does the widget offer some value to your readers? Secondly, Does the widget match with your template, that is, provides an overall professional look? And lastly, Do you receive complains from your blog readers about the widget(say it disturbs them from reading the post)??? If you end up answering "No" to the first two questions or "Yes" to the last question, then I recommend you to remove that widget now!!

    To be very frank, I know that my very own blog say, "
    TSKSOFT | A Place Where You Get Everything You Need" is not a perfect example for an optimal blog load time. I am currently working on this area to reduce the load time of my own blog. As I find out more effective methods, this post will have another series. However, please feel free to share your ideas of reducing the blog load time too via comments.


    Click here to Subscribe To FREE Email Updates from "TSKSOFT | A Place Where You Get Everything You Need", so that you do not miss out anything that can be valuable to you and your blog!!
    [Read more]

    How To Compatible Blogger Blog With Mobile Phones

    Posted On // Leave a Comment
    If you are using a Blogger Layout Template,this tutorial will helpful for you.But if your template is a blogger template,created by using Blogger Template Designer, usually this feature has already added to your template.This will really helpful to increase the number of mobile visitors of your blog.

    Now follow the simple steps given below to ready your blogger blog for mobile phones.

    1.Login to your blogger Dashboard--> Design- -> Edit HTML

    2.Scroll down to where you see below code:


    <b:include data='blog' name='all-head-content'/>


    3.Now copy below code and paste it just before the above line.


    <meta content='IE=EmulateIE7' http-equiv='X-UA-Compatible'/>
    <b:if cond='data:blog.isMobile'>
    <meta content='width=device-width,minimum-scale=1.0,maximum-scale=1.0' name='viewport'/>
    <b:else/>
    <meta content='width=1100' name='viewport'/>
    </b:if>

    Please have some time to Drop comments on this article...
    [Read more]

    Automatically Update Your Twitter And FaceBook Status When You Add A New Post On Blogger

    Posted On // Leave a Comment


    Twitter, facebook, Laconica, Ping.fm and Hellotxt are now one of the biggest visitors sources for a lot of blogs, so you have to use this services to get more visitors,
    So you have to update your status regularly each time you add a new post on your blog so your followers and friends keep receiving the latest updates from your blog.
    But updating your status regularly taking a lot of time, specially if you post many posts daily.
    Today we’ll learn a new way that`ll save us more time. by using this tool you wont need to tweet and update your status on Twitter, facebook, Laconica, Ping.fm and Hellotxt.
    You will just need to Authenticate your Twitter, facebook, Laconica, Ping.fm and Hellotxt account .
    After this add your blog’s RSS feed link there . and you are good to go.

    Lets Do It.
    Go to TwitterFeed.com, And click register now. Then fill the form and click Create account.
    Then you’ll be taken to another page contain 3 steps.
    Step 1: Name Feed & Add Source URL.
    You’ll need to enter your
    Feed Name
    RSS Feed URL, your default blog url should be the following.http://yourblogname.blogspot.com/feeds/comments/full
    Or you can enter your feedburner url if you are a member of feedburner.
    And click Continue to Step 2
    Step 2: Configure Publishing Services.
    In this step you will be able to Authenticate your accounts in Twitter, facebook, Laconica, Ping.fm and Hellotxt with your twitterfeed.com account,
    For example click on Facebook, on the next page, click Connect with facebook, a new window will be opened, enter your facebook e-mail and password and clickconnect Then click allow access and click create service
    And after you add and Authenticate all your accounts click All Done.
    Step 3: Done.
    On this step just click Go to dashboard. From your dashboard you can add, edit or remove services from your account.
    And now you are done.

    Please Pass Your Feedback Through Comments...!
    [Read more]

    How To Improve Or Increase Your Alexa Traffic Rank

    Posted On // Leave a Comment

    A collection of methods which can improve your Alexa Traffic Rank What is the Alexa Rank? In simple terms, the Alexa Rank is a ranking system of your website which bases its ranking on the level of traffic each website receives from the number of people who visit a website with the Alexa toolbar installed. The most important element of any website is content – good quality informative content cannot be beaten when trying to get a good page rank. The more people who visit your website and return or recommend it, the more your traffic will naturally increase. Below are a few methods that can help to improve your alexa rank :
    1) Install the Alexa toolbar on your computer and request that anyone who knows you do the same.
    2) Put an Alexa rank widget on your website. Each click can count as a visit even if the toolbar is not used by the visitor.
    3) Write an article or blog on Alexa. Webmasters love searching methods to improve their sites. Webmasters are also very likely to have the Alexa toolbar installed. Each visit will increase your alexa rank.
    4) Use forums to post messages that include your url. Try and make your post interesting to encourage readers to visit your site.
    5) Make use of social networking sites. Get your website Dugg and you could increase traffic. Make sure anything that is Dugg is note worthy.
    If you enjoyed this post, make sure you subscribe to my RSS feed!
    [Read more]

    How to remove blogger navbar

    Posted On // Leave a Comment
    That’s the thing which everyone want to remove from his blog. Now it’s time to do it and i will help you.
    But first of all i want to tell you what exactly is the blogger navbar. It gives a few options:
    -to search in the blog
    -to go to random chosen blog
    -to mark the blog as spam
    If you don’t want to have this navbar on your blog anymore just login in your blogger account, then toLayout, then to Edit HTML and after that you should put this Below code somewhere in before the end of HEAD tag:

    #navbar-iframe {
    display: none !important;
    }
    [Read more]

    Javascript to Display Total Posts Comments and Online Users in Blogger

    Posted On // Leave a Comment
    Now you can show total number of posts, total number of comments and total number of current number of online readers of your blogger hosted blog, this trick/tip is for you with which You can show total number of posts, comments and number of users online, in your blog using HTML/Javascript Widget. After the following below given steps, you will get the results as shown in below shown picture.
    Javascript to Display Total Posts Comments and Online Users in Blogger

    if you want to show the statistics of your blog as shown in above picture, just follow the steps given below.
    • On Your Dashboard, Click on Layout (see below shown picture for further assistance)
    Select Blogger Layout

    Now Add an HTML/Javascript Widget and Paste Below given code in that HTML/Javascript Widget.


    <script style="text/javascript">
    function totalPosts(json) {
    document.write('Stories: <b>' + json.feed.openSearch$totalResults.$t + '</b><br>');
    }
    function totalComments(json) {
    document.write('Comments: <b>' + json.feed.openSearch$totalResults.$t + '</b><br>');
    }
    </script>
    <script src=" /feeds/posts/default?alt=json-in-script&callback=totalPosts"></script>
    <script src=" /feeds/comments/default?alt=json-in-script&callback=totalComments"></script>
    <p style="margin-top: 0; margin-bottom: 0">
    <table border="0" bordercolor="#111111" id="AutoNumber1" cellpadding="0" cellspacing="0" style="border-collapse: collapse" width="100%">
    <tr>
    <td width="35%">
    Online Readers:</td>
    <td width="65%"><p style="margin-top: 0; margin-bottom: 0"><b><script src="http://fastonlineusers.com/on3.php?d=YOURBLOG" type="text/javascript"></script></b></p></td>
    </tr>
    </table></p>
    <script type="text/javascript">
    try {
    var pageTracker = _gat._getTracker("UA-4679235-4");
    pageTracker._trackPageview();
    } catch(err) {}</script>


    [Read more]